One shared pool for all positions. Lower liquidation risk per trade — profits in one position buffer losses in another. Risk: entire wallet can be wiped.
Fixed collateral per position. Maximum loss = what you allocate. Hard liquidation floor makes risk predictable and beginner-friendly.
What Is Cross Margin?
L0: Cross margin is a mode where your entire futures wallet backs every open position.
In cross margin mode, all your open positions draw from a single shared collateral pool — your full futures wallet balance. When one position needs more margin to stay above the maintenance threshold, the exchange automatically pulls from the rest of your available balance to keep it alive. This is also the default mode on Bybit's Unified Trading Account (UTA) and on Binance USDⓈ-M Futures.
The benefit is obvious: a profitable long position can cover the margin deficit of a losing short position without you needing to top up manually. This is especially powerful for traders running hedged or correlated position pairs.
Shared Collateral Pool
All positions draw from and contribute to the same margin balance. Unrealized PnL from winners helps cover losers.
Auto Loss Coverage
No manual top-up required. The wallet automatically absorbs margin calls across positions until equity hits MMR.
Default on Bybit & Binance
Cross is the default mode on Bybit UTA and Binance USDⓈ-M. Most new accounts start in cross unless changed.
What Is Isolated Margin?
L0: Isolated margin ring-fences each position to the margin you assign it.
In isolated margin mode, you manually assign a specific amount of collateral to each position. That amount is the most you can lose on that trade — no matter what happens to your other positions or overall wallet. When the position's equity drops to the maintenance margin level, only that position gets liquidated. Your remaining balance stays untouched.
The liquidation price in isolated mode is calculated using a straightforward formula:
Isolated Liquidation Price Formula
Liq Price (Long) = Entry Price × (1 − 1/Leverage + MMR)
Liq Price (Short) = Entry Price × (1 + 1/Leverage − MMR)
MMR = Maintenance Margin Rate (e.g. 0.5% at low leverage tiers on Bybit/Binance)
Per-Position Collateral
Each trade has its own isolated margin bucket. Loss is hard-capped at that allocation — nothing else is touched.
Manual Top-Up Available
If a position is near liquidation, you can add more margin to push the liquidation price further away.
Predictable Liquidation
You know exactly where liquidation happens before you enter. Use the liquidation calculator to pre-plan.
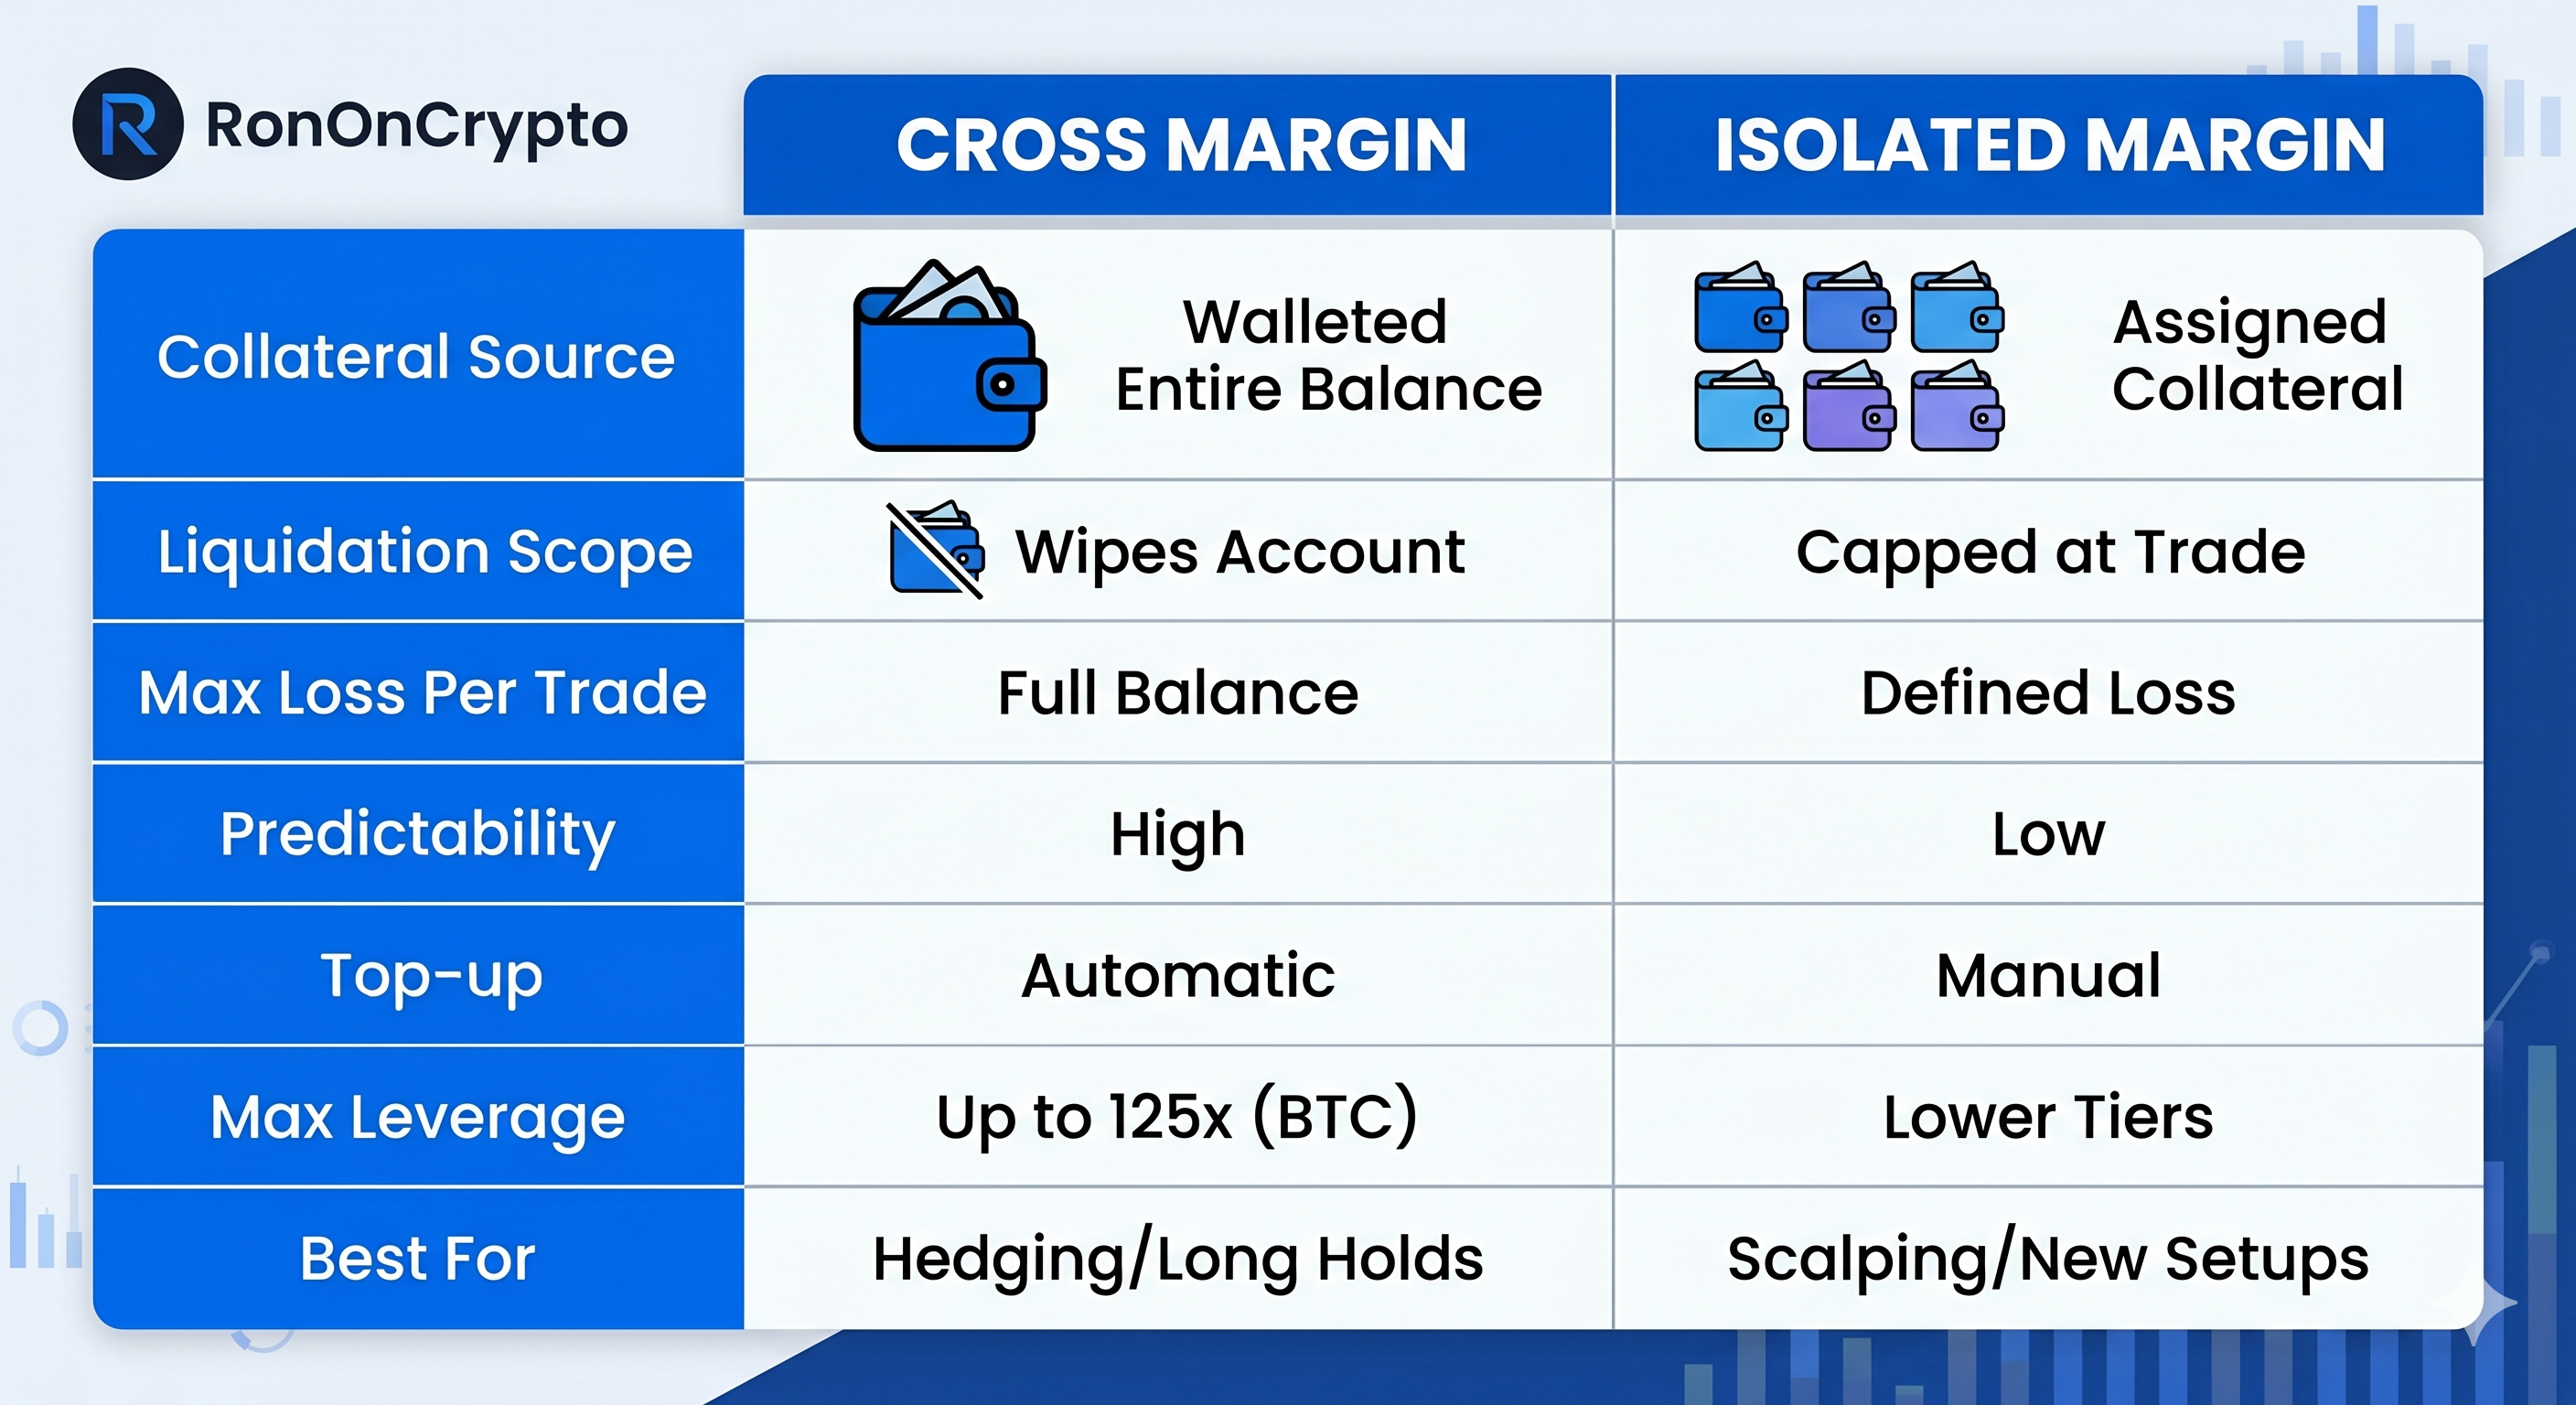
Cross vs Isolated: Side-by-Side Comparison
L0: Core difference is risk scope — cross shares one pool, isolated locks risk per trade.
Source: Bybit UTA documentation, Binance USDⓈ-M Futures documentation (April 2026)
How Liquidation Works in Each Mode
L0: Isolated liquidates one position at its set margin; cross liquidates when total equity hits maintenance margin.
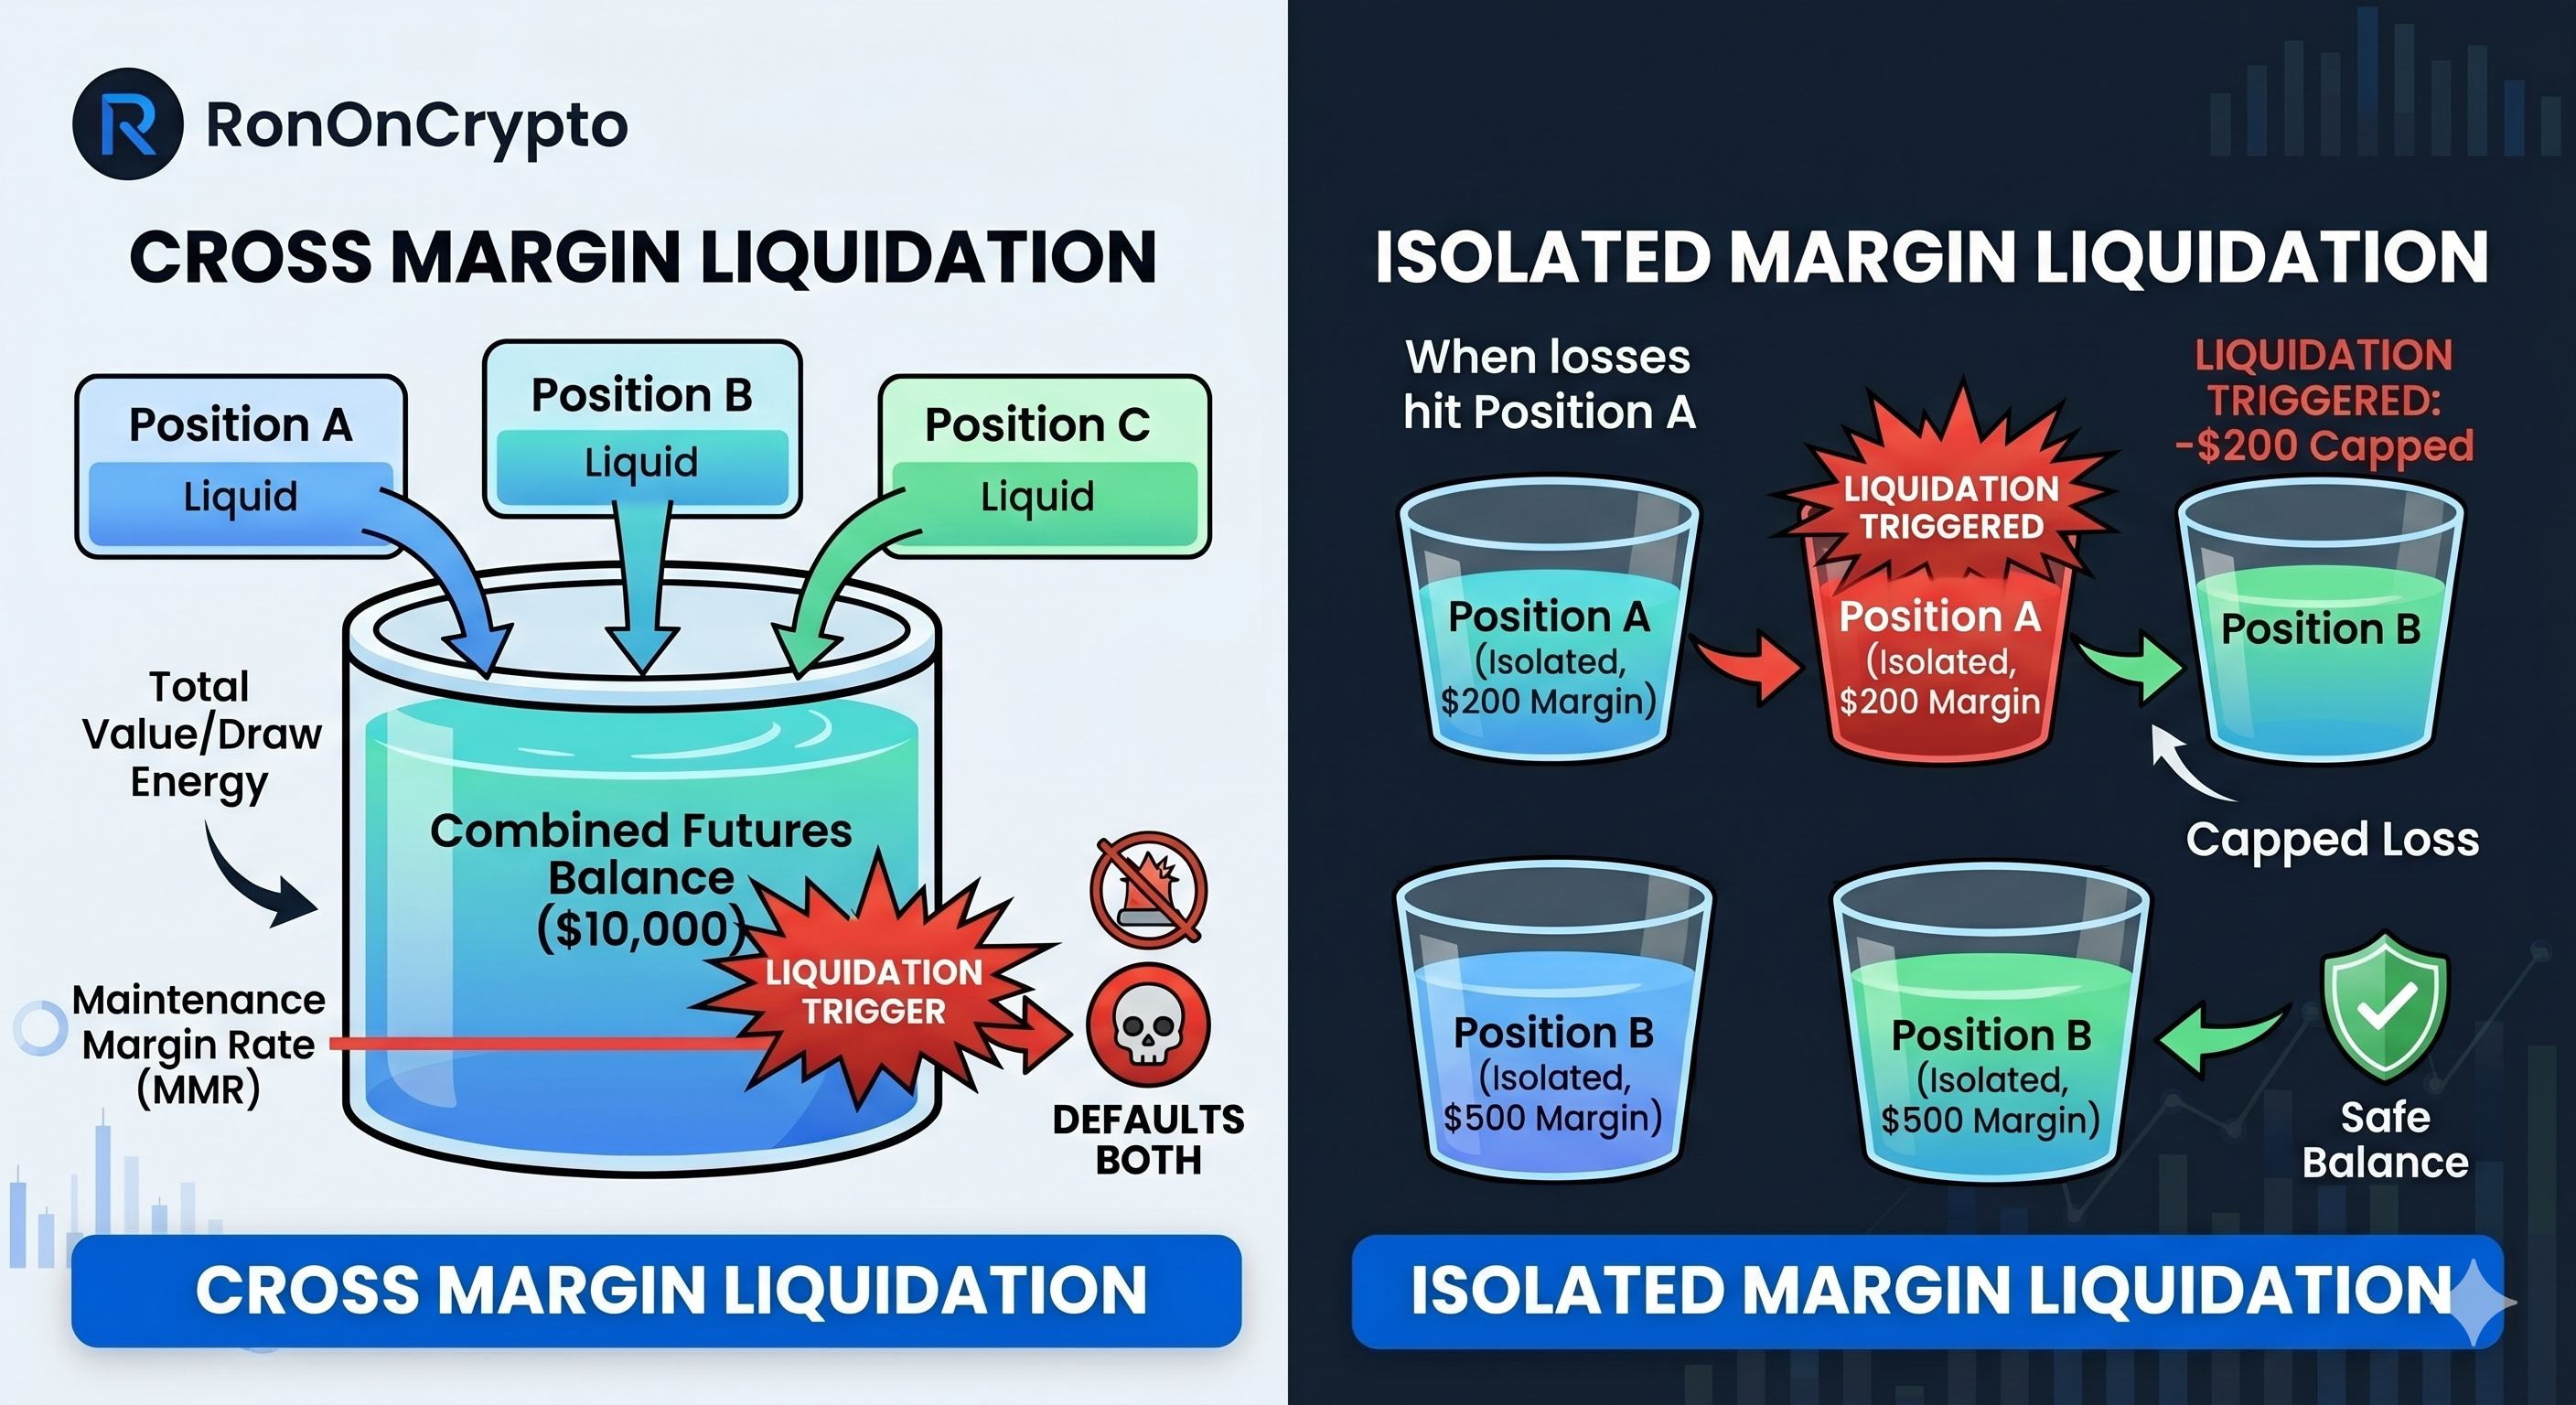
- 1Total equity (balance + unrealized PnL) across all positions is monitored continuously
- 2When total equity falls below combined Maintenance Margin (MMR × notional), warning triggers
- 3Exchange attempts partial position reduction to restore equity
- 4If reduction fails and equity hits zero, all positions are force-closed
- 5Result: entire futures wallet can be wiped in a single bad sequence
- 1Each position has its own equity tracked separately from the rest of your account
- 2When isolated position equity reaches its maintenance margin level, that position triggers
- 3Exchange liquidates only that specific position — no spillover to other positions
- 4Remaining wallet balance is completely unaffected — no auto-top-up from other funds
- 5Result: maximum loss is the allocated isolated margin, nothing more
Bybit MMR Tiers (BTC/USDT Perpetual, April 2026)
Source: Bybit Help Center — Perpetual Trading Risk Limits (April 2026). Binance uses similar tiered MMR.
Cross vs Isolated Margin on Bybit
L0: Bybit defaults to cross margin on the Unified Trading Account; switch to isolated per symbol in position settings.
Bybit's Unified Trading Account (UTA) launched in 2022 and made cross margin the default. In UTA, your spot, perpetuals, futures, and options all share one margin pool — this is effectively cross margin at the account level. You can still switch individual symbol positions to isolated margin by clicking the margin mode indicator next to any USDT perpetual contract.
Bybit also offers Auto-Margin Replenishment (AMR) in isolated mode — when your isolated position's margin ratio drops below a threshold, Bybit automatically transfers from your available balance to top up the isolated position. You can toggle AMR on/off per position. With AMR off, isolated mode behaves strictly — no auto top-up, hard liquidation at the allocated margin.
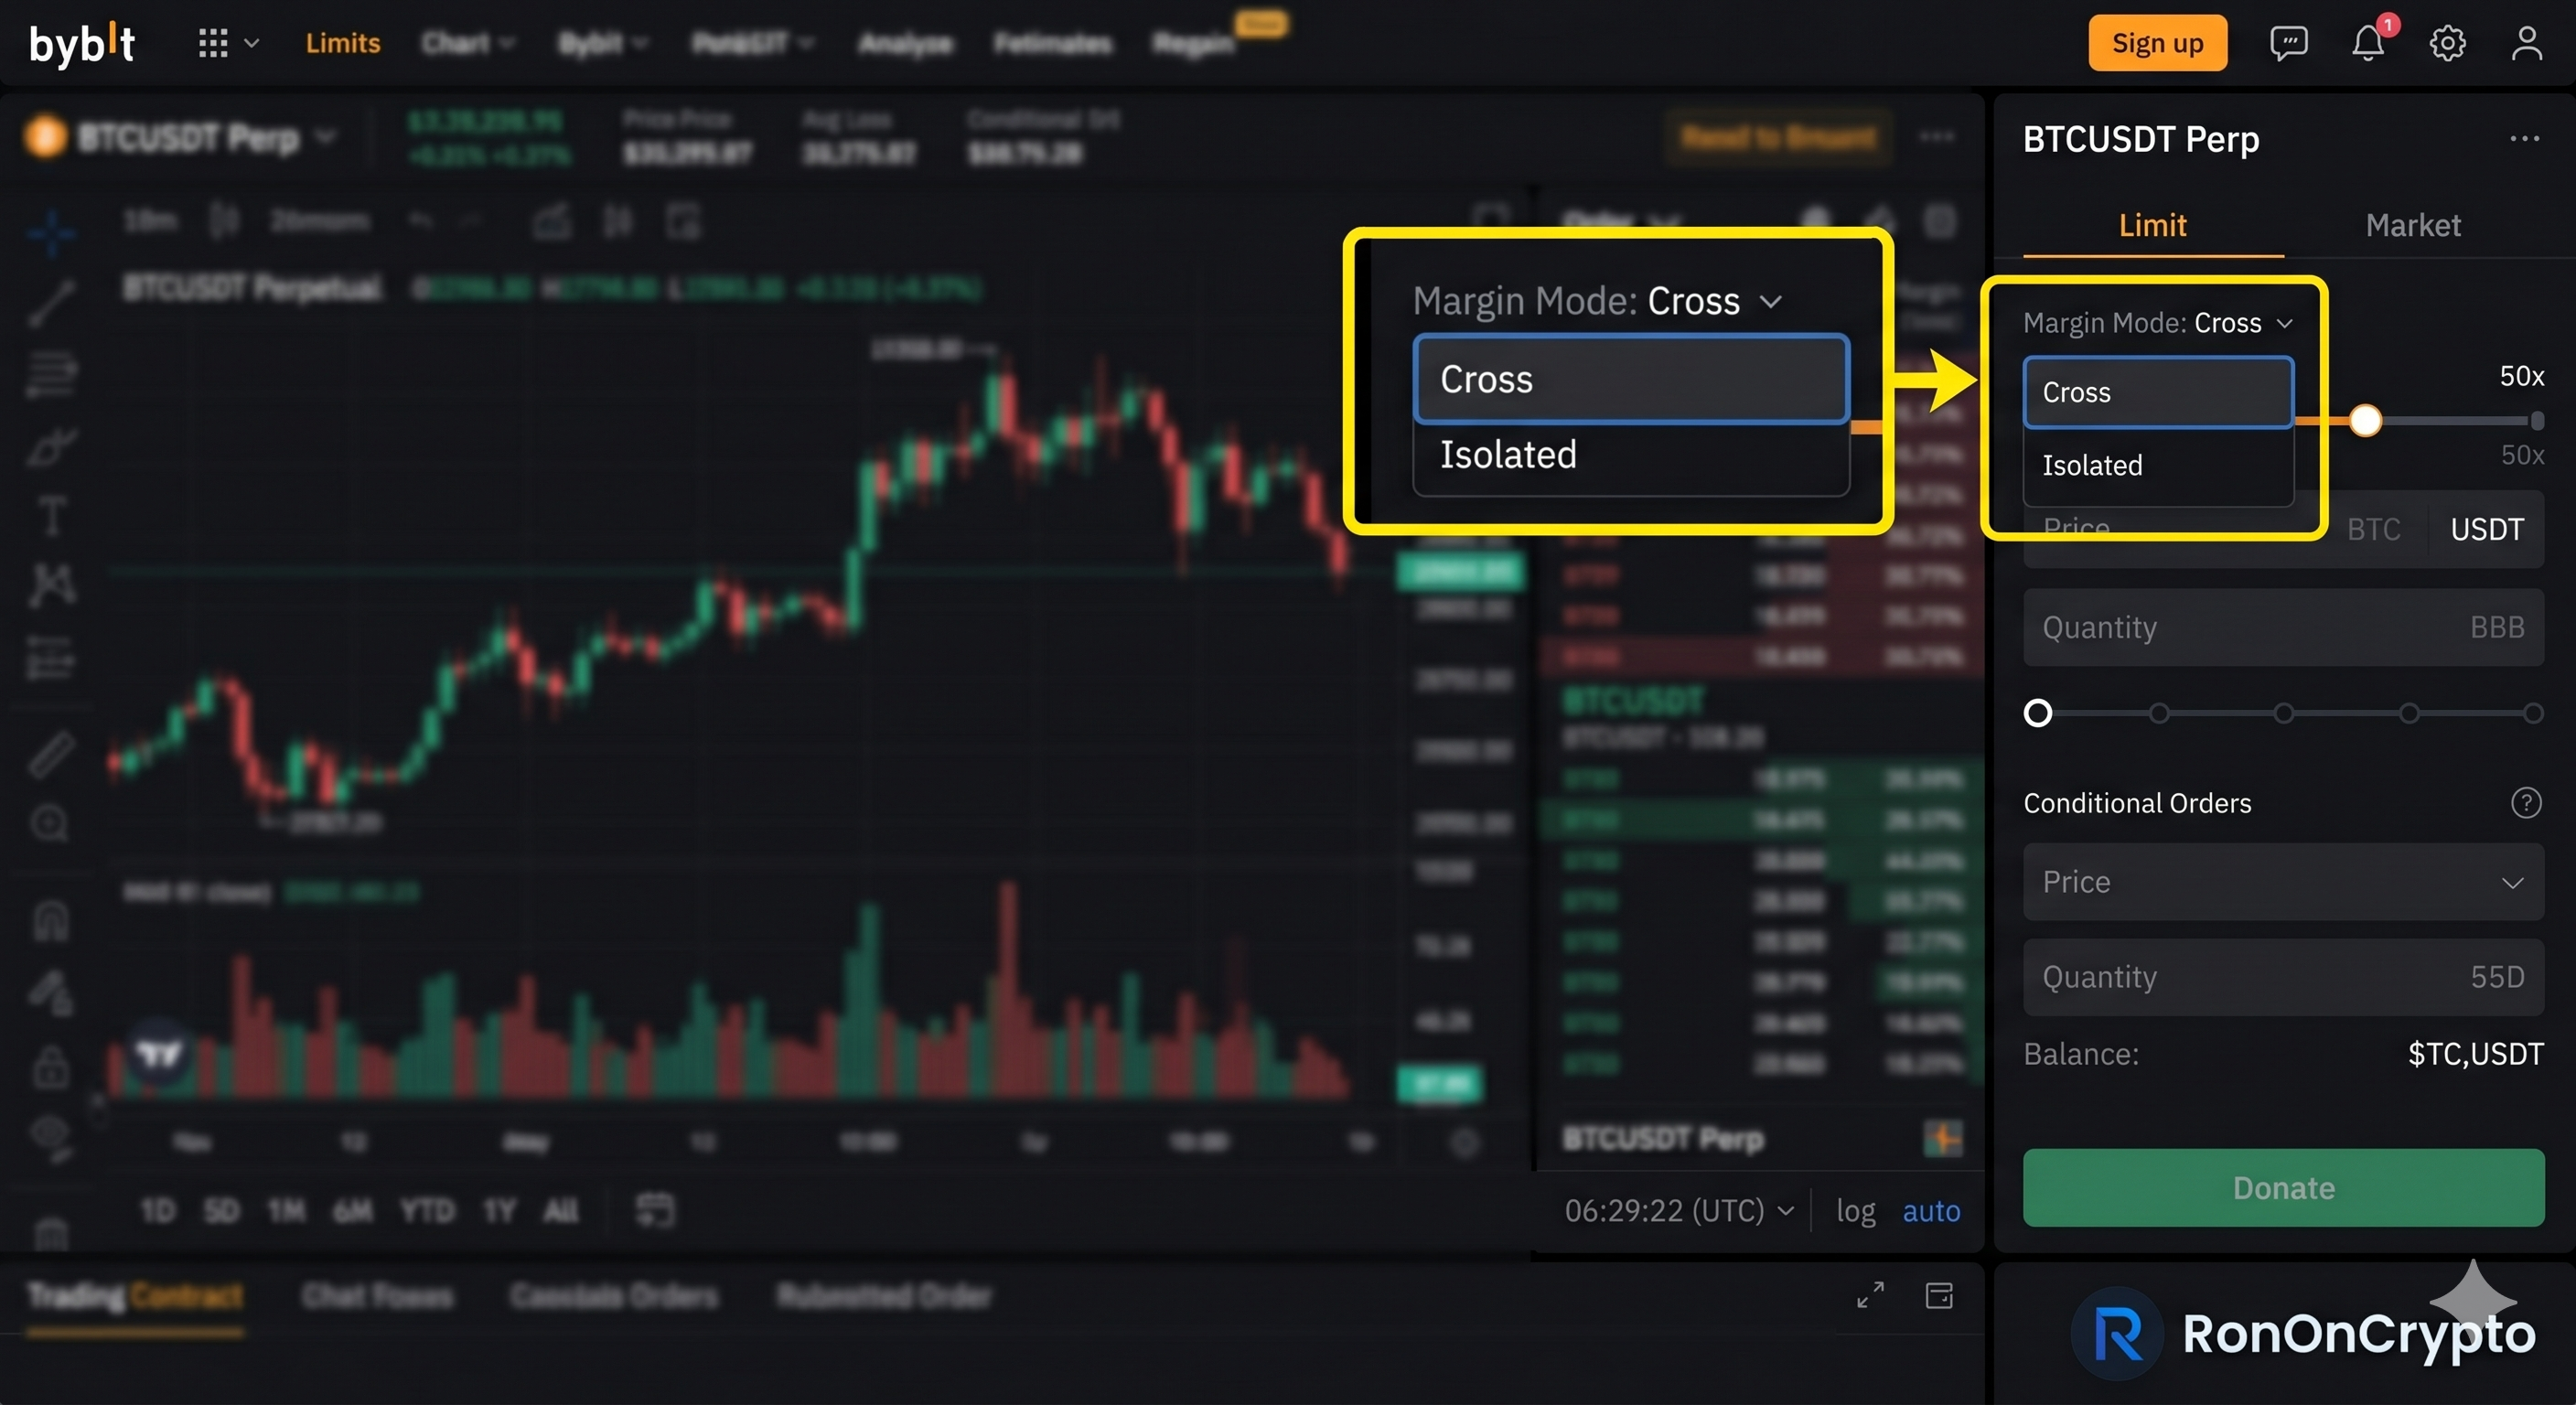
Go to Derivatives → USDT Perpetual and open your target contract (e.g., BTCUSDT)
In the order panel (right side), find the margin mode toggle — shows 'Cross' or 'Isolated' next to the leverage slider
Click the mode label to open the margin mode selector — choose Cross or Isolated
If switching to isolated, set your desired leverage and confirm the allocated margin amount
Note: you cannot switch modes while a position is open for that symbol — close the position first
Trade on Bybit with full margin control
Switch between cross and isolated per symbol. Up to 100× on BTC perps. AMR toggle for semi-auto isolated mode. New accounts get up to $30,000 in welcome rewards.
Cross vs Isolated Margin on Binance
L0: Binance lets you pick cross or isolated per contract directly from the USDⓈ-M order panel.
On Binance USDⓈ-M Futures, the margin mode toggle sits at the top-left of the order panel for each contract. Clicking it opens a modal where you can switch between Cross and Isolated. Binance also supports a one-way vs hedge position mode — if you're in hedge mode, you can hold both a long and a short on the same symbol simultaneously, each with their own isolated margin.
One important Binance-specific behavior: cross-collateral on Binance lets you use multiple assets (BTC, ETH, BNB, stablecoins) as margin for your USDⓈ-M positions in cross mode — not just USDT. This is a capital efficiency feature not available in isolated mode.
Margin toggle per contract
Each contract (BTCUSDT, ETHUSDT, etc.) has its own margin mode setting. You can have BTC in cross and ETH in isolated simultaneously.
125× max leverage (BTC cross)
In cross margin on BTCUSDT, max leverage reaches 125×. In isolated mode, max leverage is often lower depending on your risk tier.
One-way + hedge mode
In hedge mode (position mode setting), you can run simultaneous long and short on the same symbol in isolated margin.
Cross-collateral with BNB
In cross mode, BNB held in your futures wallet can act as collateral (with a discount haircut) — reducing USDT requirement.
When to Use Cross Margin
L0: Use cross margin for diversified portfolios with hedges or correlated positions.
Hedged Portfolios
Running a BTC long and a BTC short simultaneously? Cross margin lets unrealized gains on one leg buffer the other. Without cross, you'd need to manually manage margin on both positions independently.
Low Leverage Long Holds
If you're holding a 2–5× leveraged position for days or weeks, cross margin reduces the chance of liquidation from short-term volatility spikes. The full wallet buffer absorbs the noise.
Correlated Asset Pairs
Trading BTC and ETH simultaneously in the same direction? Since they're correlated, cross margin makes sense — a BTC pump often supports ETH, meaning combined equity rarely hits the danger zone.
When to Use Isolated Margin
L0: Use isolated for high-leverage single trades where you want a hard loss cap.
Scalping & High Leverage
Running 20×–50×+ leverage on a quick scalp? Isolated is the only sensible choice. You define exactly how much can be lost. A bad trade doesn't cascade into your entire account.
News & Event Trades
Trading around volatile events (Fed announcements, ETF approvals, hack news)? Isolated caps the damage if the move goes against you. News moves can be extreme and fast — isolated limits blowup risk.
Learning & New Setups
Testing a new trading setup or exchange feature? Use isolated so a mistake doesn't cost you more than your test allocation. Ideal for beginners building discipline with defined risk.
Pros and Cons
- Lower liquidation risk per position — shared buffer absorbs volatility
- No manual top-up — wallet auto-covers margin calls
- Ideal for hedging and correlated pair trades
- Higher max leverage tier on Binance (up to 125×)
- Less micro-management — great for longer-duration holds
- Full account balance is at risk — one bad set of trades can wipe everything
- Liquidation math is complex — harder to know your exact liquidation price upfront
- Fat-finger or mismanaged trades can drain the entire wallet
- Fixed maximum loss — you know the worst case before entering
- Predictable liquidation price — easy to calculate with the formula
- Beginner-friendly — failure is contained to one trade at a time
- Safer for high leverage (>20×) speculative positions
- Other positions / wallet untouched if one trade liquidates
- Manual top-up required to extend position life when margin runs low
- Earlier liquidation — no shared buffer to absorb short-term volatility
- Lower max leverage on some Binance risk tiers vs cross mode
I use isolated margin by default for anything above 5× leverage. It keeps my risk management clean — I know my max loss before I click buy. For my longer swing positions at 2–3× leverage on BTC or ETH, I use cross margin in Bybit UTA because the shared buffer lets the trade breathe without me babysitting margin.
The single biggest mistake I see new traders make: running high-leverage positions in cross margin and getting surprised when a 15% adverse move wipes their entire wallet. Start with isolated. Learn the liquidation math. Graduate to cross when you run hedged books.
Practice Both Modes on Bybit
Switch between cross and isolated per symbol. Up to 100× on BTC perps. Built-in liquidation calculator. Best margin tooling in the industry alongside Binance.
Open Bybit Account — Up to $30K Bonus